M.H-D.D Workflow 2024: A Guide to Photogrammetry for Digital Doubles
Creating high-quality digital doubles requires precision, the right equipment, and an understanding of photogrammetry. Whether you're a 3D artist, game developer, or digital creator, following a structured workflow can significantly improve the outcome.
In this guide, we break down Step 1: Photogrammetry, covering best practices, equipment recommendations, and insights on refining your workflow.
Step 1: Mastering Photogrammetry (October 25)
Learning the Basics
Before diving into your first scan, it's crucial to understand photogrammetry fundamentals. The following resources provide a solid foundation:
- Creating Digital Doubles With Single-Camera Photogrammetry | The Gnomon Workshop
- Creating Facial Blendshapes Using Photogrammetry | The Gnomon Workshop
- How To Create a Custom Metahuman Tutorial | UE5 (YouTube)
If you want the best quality results, consider hiring a professional photographer. However, if you're aiming for a medium-quality scan, you can follow YouTube tutorials and set up your own capture session.
Before your shoot, review the photogrammetry documentation to ensure you understand the process and setup requirements.
Lessons Learned & Future Improvements
1. Invest in a $100 Gazebo for Outdoor Shoots
A gazebo provides consistent lighting and reduces harsh shadows from direct sunlight. A cheap white gazebo works well as a DIY light diffuser.
🔗 Find affordable gazebos
2. Use Facial Markers for Reference Points
RealityCapture relies on consistent reference points across multiple photos. If your face lacks prominent features (such as acne or freckles), it’s beneficial to add small, non-intrusive dots in key areas.
These marks help with component alignment, ensuring that the photogrammetry software correctly stitches together facial geometry.
3. Purchase an X-Rite Color Chart
To achieve accurate color representation, use an X-Rite Color Chart. This ensures consistent skin tone and texture fidelity across images, reducing the need for manual color correction later.
Essential Equipment & Next Steps
1. Camera & Lens
- Best Option: A high-resolution DSLR or mirrorless camera
- Lens Recommendation: Use a 50mm to 85mm lens to avoid distortion
- Settings:
- ISO: 100-200 for minimal noise
- Aperture: f/8 to f/11 for depth of field
- Shutter Speed: 1/125 or faster to prevent motion blur
- Format: Capture in RAW for maximum detail
2. Lighting Setup
- Use diffused lighting (e.g., softboxes) to minimize harsh shadows
- Multiple light sources improve depth and even exposure
3. Tripod & Stability
- If the photographer isn’t moving, use a tripod for stable, consistent shots
4. Clothing Considerations
- Wear a tank top to ensure that the neck and shoulders remain visible
- Avoid bulky clothing that could obscure facial and body contours
Photogrammetry Best Practices
1. Positioning & Facial Expressions
- Neutral Pose: Keep your face relaxed and expressionless for the primary scan
- Expression Variations: If capturing different facial expressions, hold each firmly and consistently while being photographed
2. Camera Angles & Coverage
- Ensure full 360-degree coverage by taking photos from:
- Front
- 45-degree angles
- Full side profiles
- Rear views
- Vary elevation (above head, eye level, below chin)
3. Consistency in Photos
- Maintain consistent settings across all shots (ISO, aperture, shutter speed)
- Ensure 60-80% overlap between images for accurate stitching
- Capture 40-70 photos per expression for comprehensive coverage
4. Organize Your Data
- Sort images into folders based on expressions (e.g., "Neutral," "Smile," "Frown")
- This makes it easier when processing the scans in RealityCapture or other software
Step 2 – Processing (October 29)
Preparation
- Learn the Basics: Watch this RealityCapture tutorial for a full walkthrough.
- Use the Help Window: RealityCapture includes a built-in Help section that guides you through the process step by step.
- Troubleshooting: If you run into issues, tools like ChatGPT can assist in resolving them quickly.
Lessons Learned & Future Improvements
- Export Two Versions of the Mesh
- Full Detail (24M polygons): High-resolution but computationally heavy. ZBrush may be needed for handling.
- Optimized Version (500K - 1M polygons): Ideal for Blender, Unreal Engine, and real-time applications.
- Avoid Software Crashes
- A high-poly model (24M polygons) can crash Blender, Unreal Engine, etc.
- Solution: Use MeshLab to reduce the poly count without losing key details.
- Texture Projection later in the pipeline helps recover lost details.
Step 2.1 – Exporting the Mesh (October 30)
Process
- Export the Mesh directly from RealityCapture.
- Simplify the Model: If needed, use either:
- RealityCapture’s built-in tools
- MeshLab for precise polygon reduction (covered in Step 2.2).
Tutorial Reference: RealityCapture Walkthrough
Step 2.2 – Reducing Polygons with MeshLab (November 6)
Mesh Optimization Workflow
1. Load Your OBJ File
- Open MeshLab →
File→Import Mesh→ Select your OBJ file. - Large files (6GB+) may take time to load, but MeshLab handles them better than Blender.
2. Inspect & Prepare for Decimation
- Enable Wireframe Mode (
Render→Draw Wireframe) to check polygon density. - Toggle Render > Toggle Texture to speed up navigation if needed.
3. Apply the Simplification Filter
- Go to
Filters→Remeshing, Simplification and Reconstruction→Quadric Edge Collapse Decimation.
4. Configure Decimation Settings
- Target Face Count: Set to 500K - 1M for performance balance.
- Preserve Features: Check Preserve Boundary / Normal / Topology for better geometry accuracy.
- Quality Threshold: Keep at 1 for maximum quality (lower if needed for performance).
5. Run & Review the Decimation
- Click Apply and let MeshLab process the model.
- Check the Wireframe View to ensure key details remain intact.
6. Export the Optimized Mesh
- Go to
File→Export Mesh As→ Save as OBJ or FBX for Blender or Unreal Engine. - Enable Export Normals and Export Vertex Colors if necessary.
Step 3 – Conforming the Mesh to Metahuman (November 7)
Importing the Decimated Mesh into Unreal Engine
- Open Unreal Engine and import the decimated OBJ file.
- Open the Output Log and enter the following command:
mh.Identity.ExportMeshes TRUE- This exports the conformed mesh after setting up Metahuman Identity.
Creating a Metahuman Identity
- Follow the steps from the tutorial video:
- Timestamp:
00:06:56– Metahuman Face from Mesh
- Timestamp:
- Complete the Metahuman Identity Setup and proceed to the next step.
Processing the Conformed Mesh in Blender
- Open Blender and create a new file.
- Import the conformed mesh OBJ file from:
Unreal Project/saved/... - Add the Weighted Normal Modifier and apply it.
- Save and export the file.
Finalizing the Conformed Mesh
- Continue following the tutorial at
00:06:56– Metahuman Face from Mesh - Import the updated conformed mesh with the Weighted Normal Modifier applied.
- Create a new Metahuman Identity from this mesh and complete the Mesh-to-Metahuman export process.
Editing in Metahuman Creator Online
- Modify the Metahuman character by adjusting:
- Skin tone
- Eye color
- Freckles and other facial details
- Finalize the Metahuman and download it from Quixel Bridge.
Tutorial Reference: How To Create a Custom Metahuman | UE5
Step 4 – Preparing Mesh Textures with FBX 2013 Converter (November 7)
Exporting the Mesh from Metahuman to Blender
- Follow the tutorial at
00:15:51– Export Metahuman to Blender - Navigate to the Mesh-to-Metahuman folder and export:
- Both the body and face mesh
- Reset to default when exporting to ensure a clean file.
Converting Files with FBX 2013 Converter
- Open FBX 2013 Converter.
- Import the exported files and convert them.
- The converted files will automatically be saved in the FBX 2013 folder.
Tutorial Reference: How To Create a Custom Metahuman | UE5
Step 5 – LOD Setup in Blender (November 7)
Preparing the Metahuman for LOD Adjustments
- Follow the tutorial at
00:15:51– Export Metahuman to Blender. - Import the FBX files from the FBX 2013 Converter into Blender.
Cleaning Up LODs
- Delete the Root and LOD groups.
- Remove all LODs except LOD 0 for both the face and body.
Preparing the Head for Texture Projection
- Duplicate the head mesh and hide:
- Eyes
- Mouth
- Any hair or additional geometry
- Export this cleaned head mesh as an OBJ file.
- This OBJ file will be used for texture projection in RealityCapture.
Tutorial Reference: How To Create a Custom Metahuman | UE5
Step 6 – Texture Reprojection in RealityCapture (November 7)
Setting Up for Texture Projection
- Import the following into Blender:
- The conformed Metahuman mesh.
- The original photogrammetry model.
- Align both models to match the angle of the original scan for the best texture reprojection results.
Reprojecting Textures in RealityCapture
- Import the model into RealityCapture.
- Adjust the reprojection settings to ensure accurate texture transfer.
- Start the projection process and allow RealityCapture to generate the reprojected texture.
Verifying the Reprojected Texture
- Import the textured model into Blender.
- Check the results to confirm that the texture was correctly transferred.
Tutorial Reference: Texture Reprojection in RealityCapture | Rendered in UE5
Step 9 – Applying & Cleaning Up Textures (November 15-19)
Texture Cleanup Process (Photoshop & Gnomon Workshop)
- Import the texture into Photoshop.
- Download skin brushes from DeviantArt (available in the cloud folder).
- Use the Clone Tool and Skin Brush to:
- Paint over holes and major imperfections.
- Fill in any blank or missing areas.
Fixing Shadows & Adjusting Exposure
- To remove shadow areas, create a mask layer and invert it.
- Adjust exposure and gamma settings to correct lighting inconsistencies.
- Use the Paint Tool to refine shadowed areas.
Enhancing Texture Details
- Duplicate the texture layer and apply Desaturate (turns image grayscale).
- Apply a High-Pass Filter to enhance skin details.
- Save both the original and filtered images as TIFF files and export them.
Tutorial Reference: Creating Digital Doubles With Single-Camera Photogrammetry | The Gnomon Workshop
Continued – Refining the Metahuman Skin Shader & Texture Maps
Optimizing the Texture Workflow
- Integrated skin shader and texture maps while using ChatGPT to determine the best texture settings for Metahuman.
- Developed a balanced setup that is simple and doesn’t overload system resources.
Using XYZ Textures in Metahuman
- Since Metahuman characters share the same UV map, the XYZ textures transferred over automatically.
- This may need to be redone for future character adjustments.
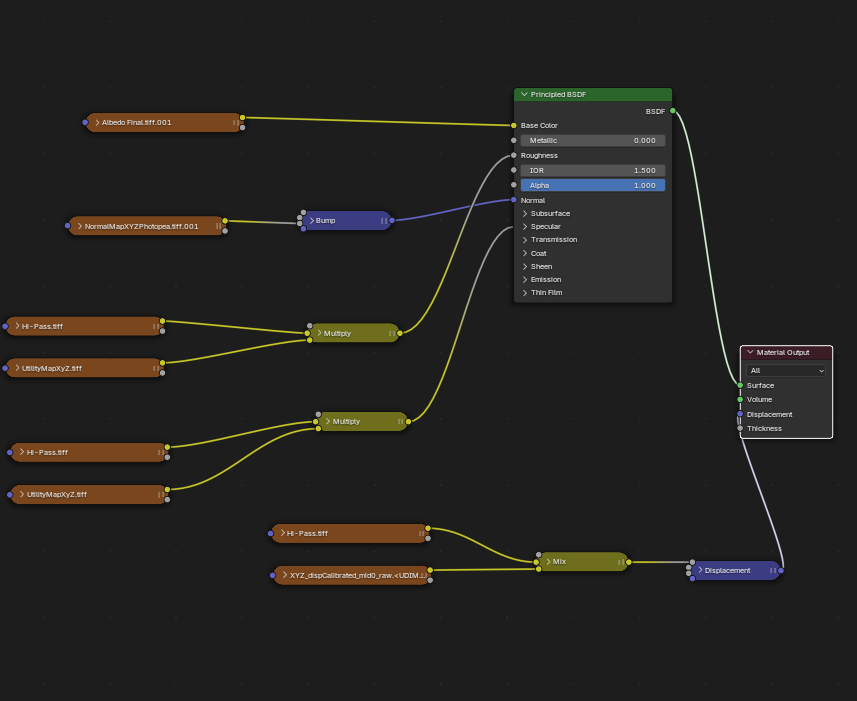
Node Setup & Refinements
- Fine-tuned the node setup for optimal skin shading and rendering.
- Ensured that the textures aligned properly with Metahuman's UV map
Step 10 – Grooming: Hair, Eyebrows & Facial Hair (December 1)
Learning the New Blender Hair Node System
- Watch tutorial videos to get familiar with the updated hair node system in Blender.
- Found the new system easier than the traditional hair workflow, especially after setting up the shading system to control hair density and length.
- After several attempts, I became comfortable with the workflow for creating realistic hair.
Fixing UV Map Errors in Hair Grooming
- Encountered UV map errors frequently while working with hair.
- Solution:
- Duplicate the faces that will be used for hair.
- Add empty hair nodes to the duplicated faces.
- Groom the hair, then go to the Objects tab (orange square icon).
- Parent the hair to the original mesh.
- Adjust the modifiers to ensure they apply to the original mesh.
- The hair can now be edited as if it were directly on the original mesh.
Tutorial References:
- Introducing: Hair Assets in Blender 3.5!
- Get into Geometry Node Hair Fast (Blender Tutorial)
- Blender 3.3 New Hair System: Full Hairstyle Guide
- How to Fix "Invalid UV Map: UV Islands Must Not Overlap"
Reflections on the Grooming Process
December – Experimenting with Hair Grooming
- Found grooming and hair styling to be challenging in achieving the ideal look for characters.
- Initially used the traditional workflow but struggled to get a natural appearance.
- Switched to geometry nodes for hair, which proved to be easier and more intuitive.
- Still not perfect, but a skill worth developing further for future improvements.
January – Transition to Houdini
- Took a break from Blender to learn Houdini and transition towards a non-destructive workflow.
- Found Houdini's procedural system more efficient and flexible for hair grooming and digital human creation.
Initial & Primary References
MetaHuman & Unreal Engine Resources
YouTube Tutorials & Demonstrations
- MetaHuman Photoreal Capture Process
- Advanced MetaHuman Techniques
- MetaHuman Workflow Breakdown
- Creating Realistic Digital Humans
- Mr. Nunez - MetaHuman Workflow
- Custom MetaHuman Guide by Joe Raasch
- MetaHuman Retopology & Facial Capture
- Digital Visual Art MetaHuman Workflow
- Refining MetaHuman Characters
Texturing & 3D Asset Development
Final Thoughts & Future Goals
This workflow serves as my roadmap to mastering MetaHuman and VFX development. My long-term objective is to:
- Create high-quality digital humans with realistic hair, skin, and expressions.
- Refine my technical expertise across Blender, Unreal Engine, and Houdini.
- Bring my VOIDSTALKER VFX film series to life using cutting-edge digital human technology.
By continuing to refine these workflows and integrate new tools and techniques, I aim to push the boundaries of realistic character creation.
Let me know if you need any refinements or additional details!